> ## Documentation Index
> Fetch the complete documentation index at: https://docs.insforge.dev/llms.txt
> Use this file to discover all available pages before exploring further.
# Configura MCP para Cursor, Claude, Windsurf y más
> Conecta Cursor, Claude, Windsurf y otros editores a InsForge mediante MCP para que los agentes de IA puedan consultar tu base de datos, autenticación, almacenamiento y funciones.
## Resumen
El servidor MCP de InsForge le da a tu asistente de codificación con IA acceso directo a tu backend: consultas de base de datos, gestión de esquemas, almacenamiento y más.
Sigue las instrucciones a continuación para tu cliente de IA. ¿No ves tu herramienta? Consulta el [directorio de agentes](https://insforge.dev/agents) para ver la lista completa de integraciones probadas.
## Requisitos previos
* Un **asistente de codificación con IA** (Cursor, Claude Code, GitHub Copilot, etc.)
* Un **proyecto de InsForge** - [crea uno aquí](https://insforge.dev) si aún no tienes uno
## Configuración local de MCP (recomendado)
Si prefieres configurar MCP localmente, selecciona tu asistente de codificación con IA a continuación:
### Instalación
Puedes instalar el servidor MCP en Cursor con un solo clic, haciendo clic en el botón "Add to Cursor" de la captura de pantalla a continuación:
 Alternativamente, puedes instalar el servidor MCP de InsForge manualmente:
1. Abre **Cursor Settings**
2. Ve a **Tools & MCP**
3. Haz clic en **New MCP Server (Add a Custom MCP Server)**
4. Pega el JSON de MCP de tu proyecto de InsForge
5. Guarda el archivo de configuración
6. Deberías ver un punto verde, que indica que InsForge se instaló correctamente
### Verificar la instalación
Para verificar la conexión, inicia una nueva sesión de chat en **Cursor** y envía este mensaje a tu agente:
```
I'm using InsForge as my backend platform, call InsForge MCP's fetch-docs tool to
learn about InsForge instructions.
```
Si la conexión se realiza correctamente, verás el indicador de estado **Connected** en tu panel de InsForge (esquina superior derecha).
### Instalación
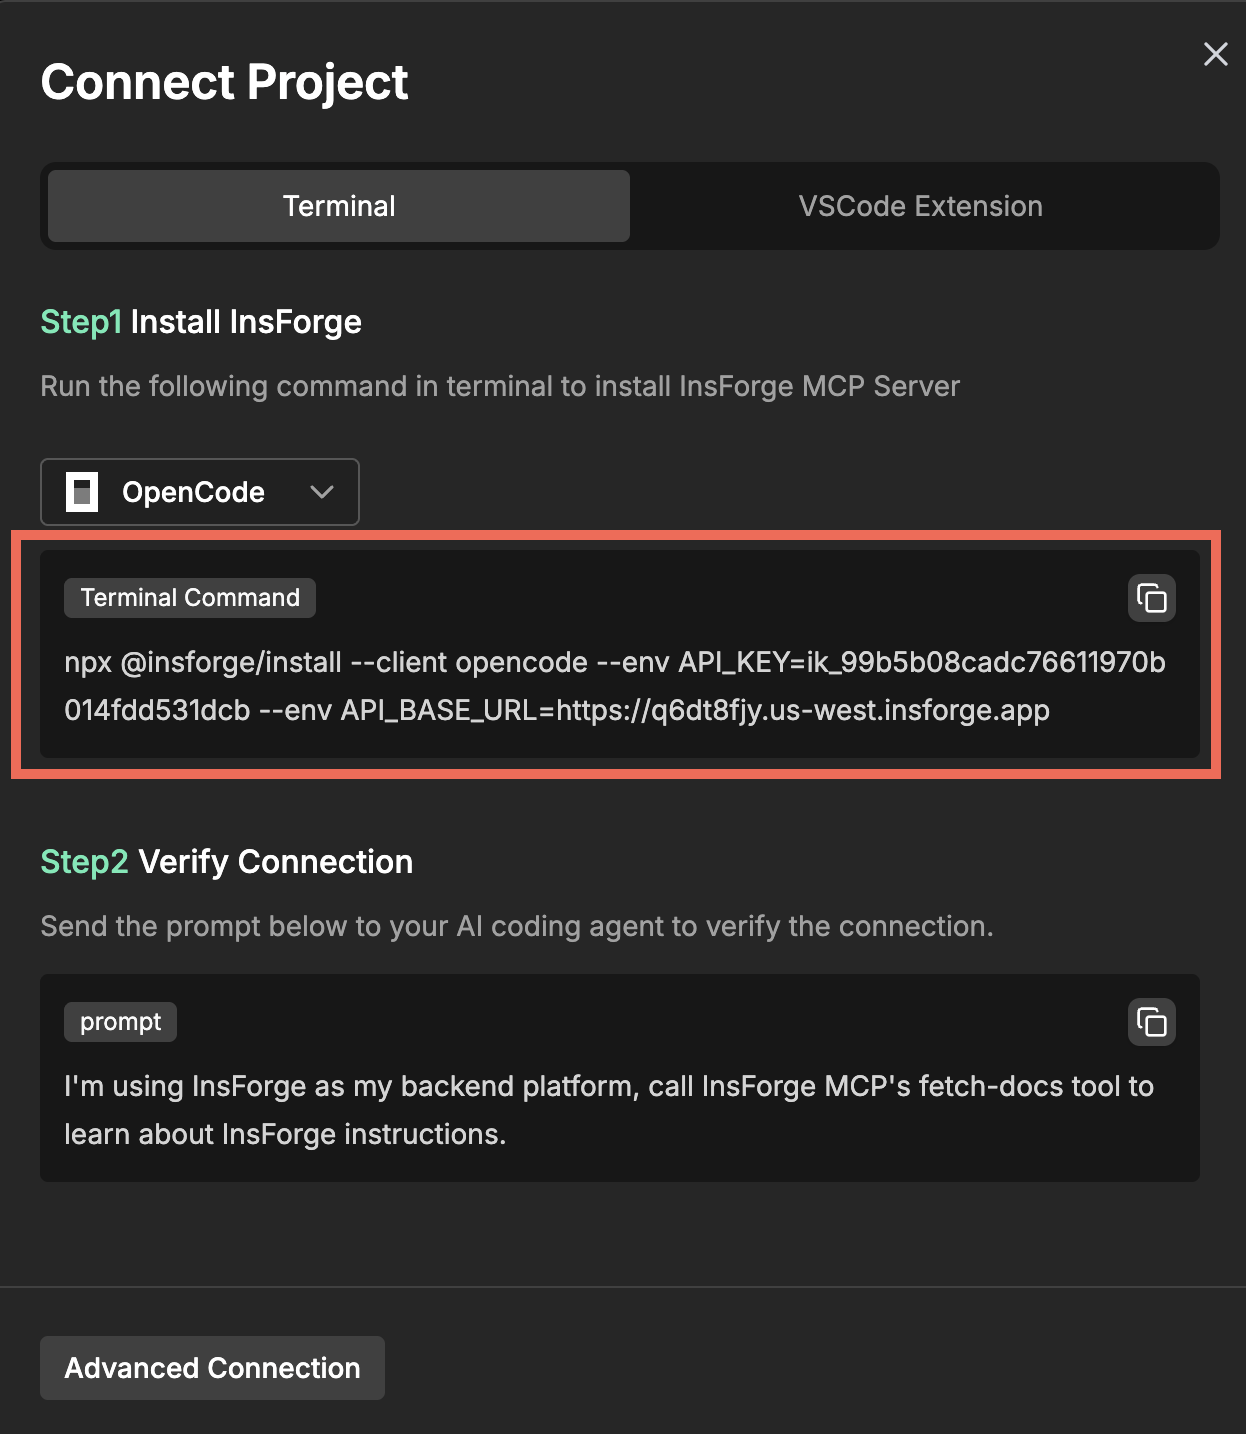
Agrega el servidor MCP de InsForge a tu **Claude Code**:
1. Selecciona **Claude Code** en la lista desplegable
2. Copia y pega el siguiente comando de instalación en tu terminal
Alternativamente, puedes instalar el servidor MCP de InsForge manualmente:
1. Abre **Cursor Settings**
2. Ve a **Tools & MCP**
3. Haz clic en **New MCP Server (Add a Custom MCP Server)**
4. Pega el JSON de MCP de tu proyecto de InsForge
5. Guarda el archivo de configuración
6. Deberías ver un punto verde, que indica que InsForge se instaló correctamente
### Verificar la instalación
Para verificar la conexión, inicia una nueva sesión de chat en **Cursor** y envía este mensaje a tu agente:
```
I'm using InsForge as my backend platform, call InsForge MCP's fetch-docs tool to
learn about InsForge instructions.
```
Si la conexión se realiza correctamente, verás el indicador de estado **Connected** en tu panel de InsForge (esquina superior derecha).
### Instalación
Agrega el servidor MCP de InsForge a tu **Claude Code**:
1. Selecciona **Claude Code** en la lista desplegable
2. Copia y pega el siguiente comando de instalación en tu terminal
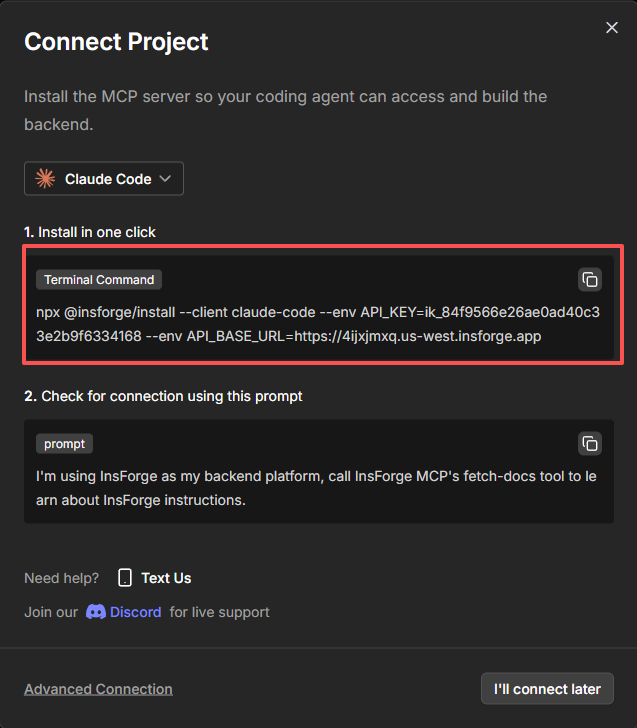 3. Ejecuta el comando
### Verificar la instalación
Para verificar la conexión, inicia una nueva sesión de chat en **Claude Code** y envía este mensaje a tu agente:
```
I'm using InsForge as my backend platform, call InsForge MCP's fetch-docs tool to
learn about InsForge instructions.
```
Si la conexión se realiza correctamente, verás el indicador de estado **MCP Connected** en tu panel de InsForge (esquina superior derecha).
### Instalación
Agrega el servidor MCP de InsForge a tu **GitHub Copilot**:
1. Selecciona **Copilot** en la lista desplegable
2. Abre la terminal y pega el siguiente comando de instalación en tu terminal de **GitHub Copilot**
3. Ejecuta el comando
### Verificar la instalación
Para verificar la conexión, inicia una nueva sesión de chat en **Claude Code** y envía este mensaje a tu agente:
```
I'm using InsForge as my backend platform, call InsForge MCP's fetch-docs tool to
learn about InsForge instructions.
```
Si la conexión se realiza correctamente, verás el indicador de estado **MCP Connected** en tu panel de InsForge (esquina superior derecha).
### Instalación
Agrega el servidor MCP de InsForge a tu **GitHub Copilot**:
1. Selecciona **Copilot** en la lista desplegable
2. Abre la terminal y pega el siguiente comando de instalación en tu terminal de **GitHub Copilot**
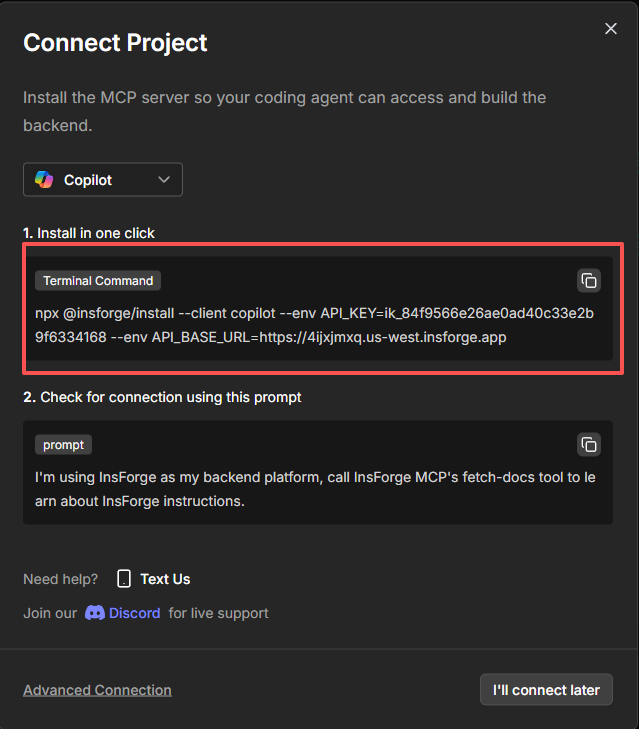 3. Ejecuta el comando
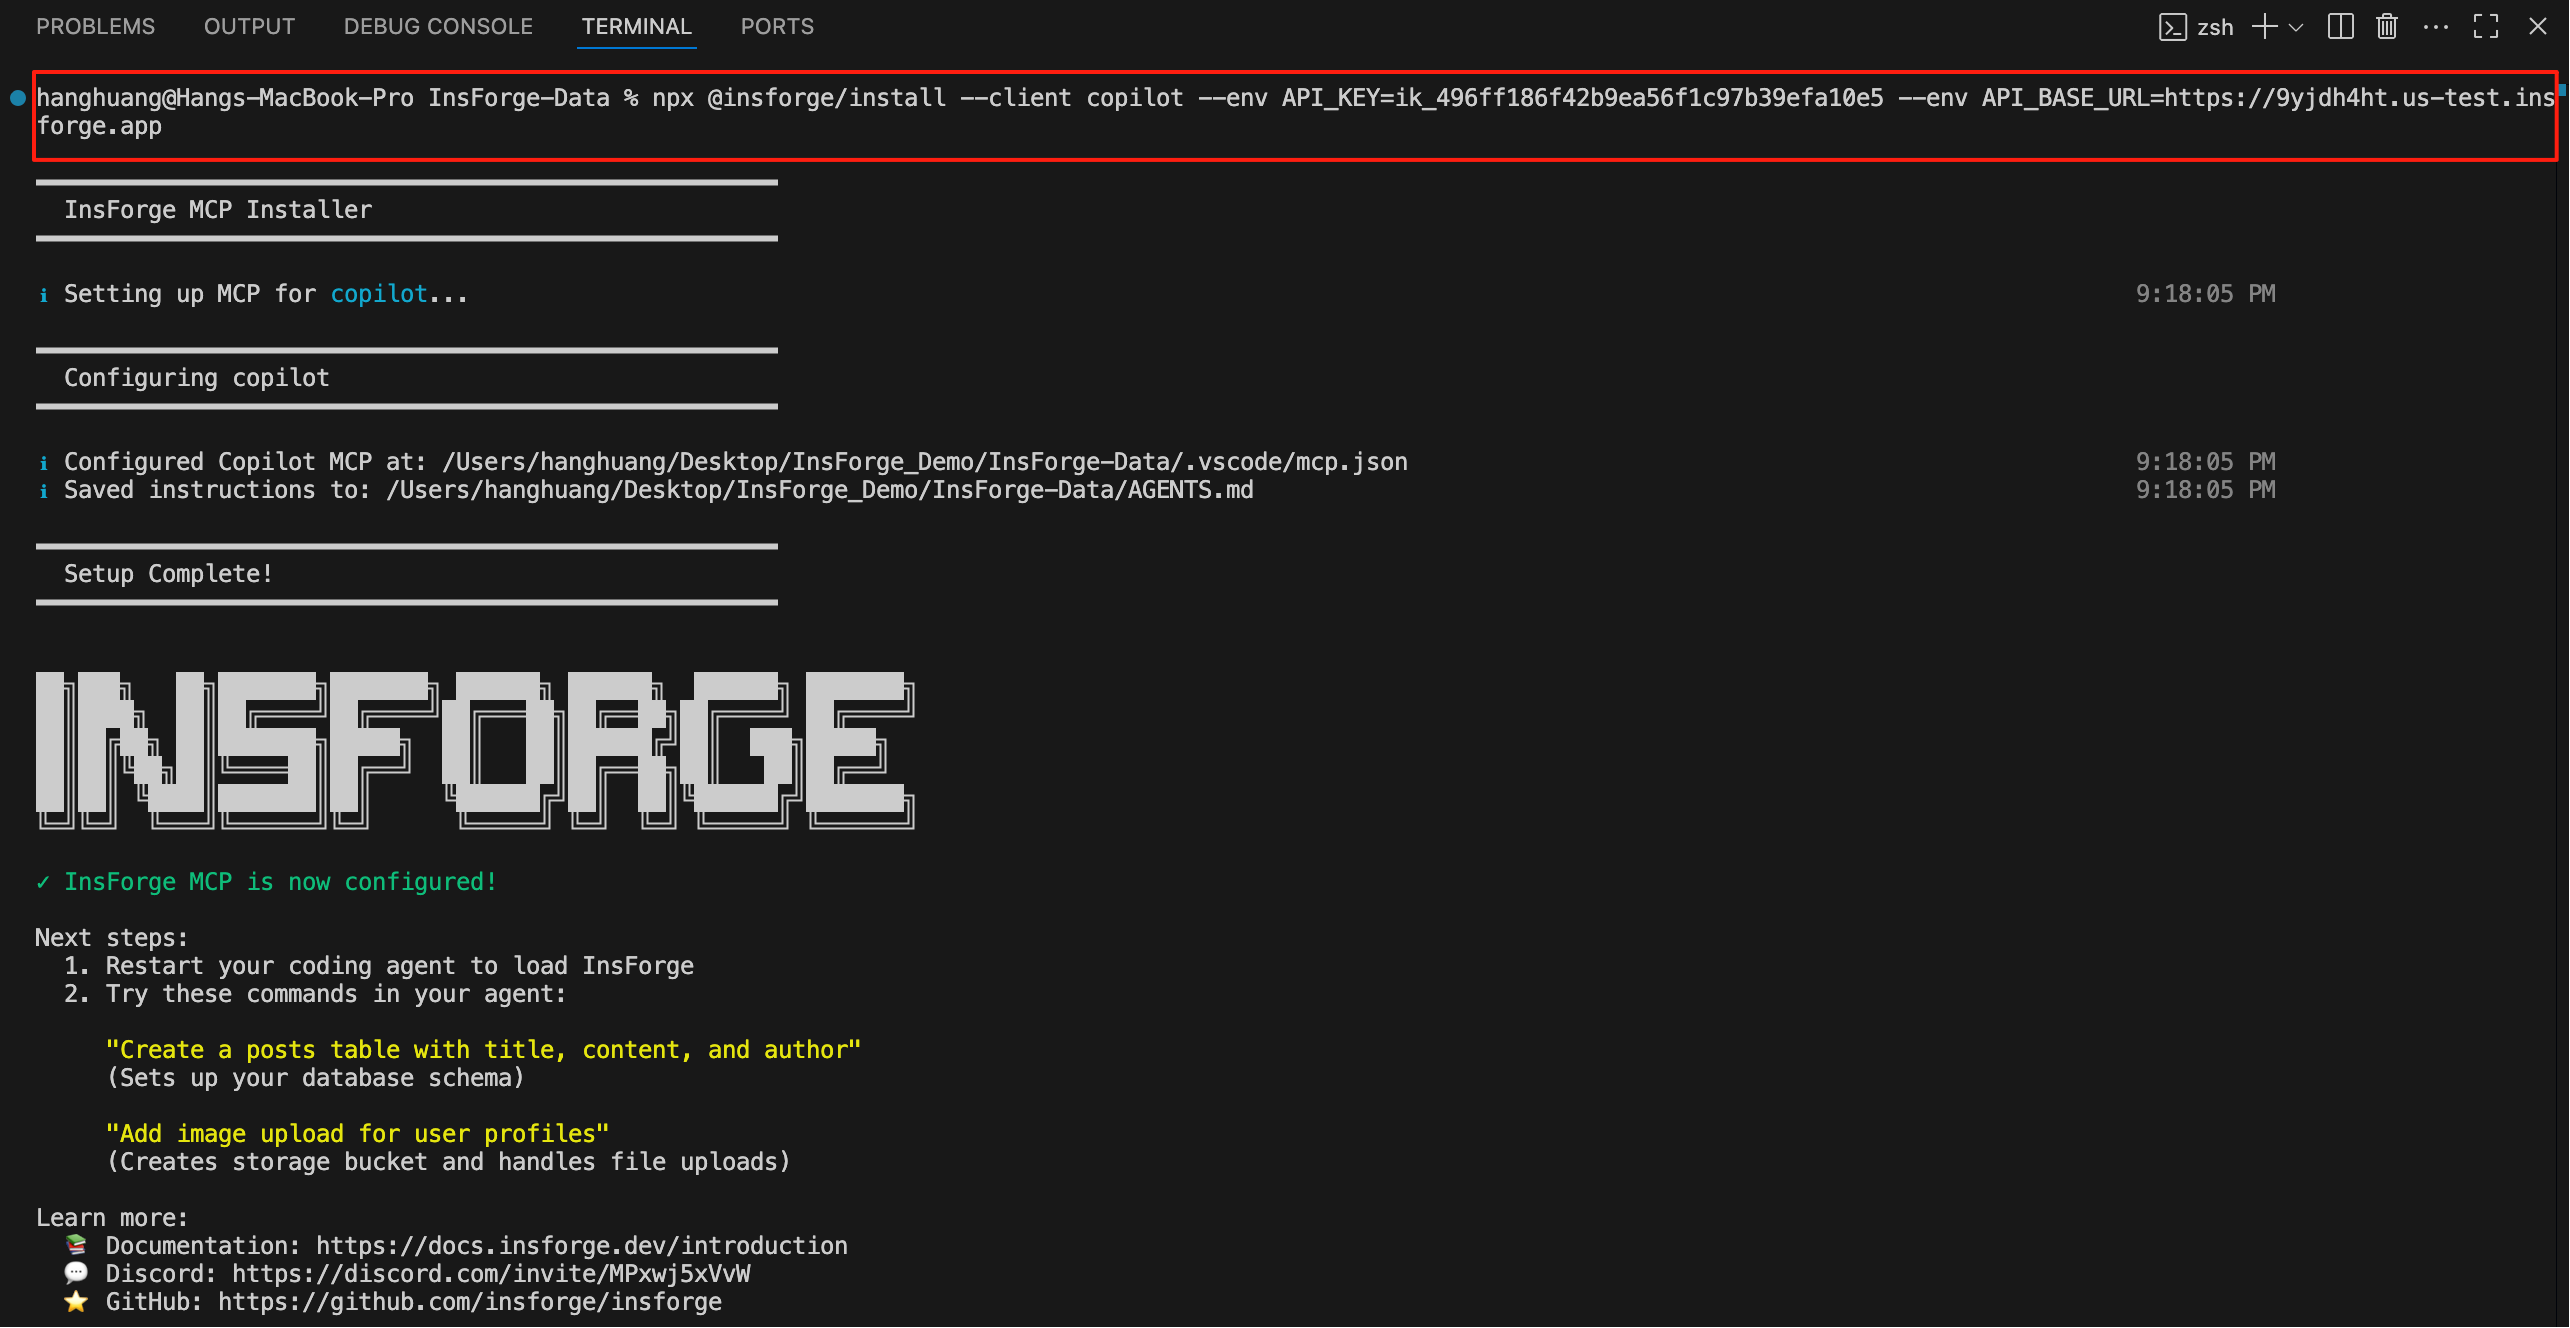 ### Verificar la instalación
Para verificar la conexión, inicia una nueva sesión de chat en **Copilot** y envía este mensaje a tu agente:
```
I'm using InsForge as my backend platform, call InsForge MCP's fetch-docs tool to
learn about InsForge instructions.
```
Si la conexión se realiza correctamente, verás el indicador de estado **MCP Connected** en tu panel de InsForge (esquina superior derecha).
### Verificar la instalación
Para verificar la conexión, inicia una nueva sesión de chat en **Copilot** y envía este mensaje a tu agente:
```
I'm using InsForge as my backend platform, call InsForge MCP's fetch-docs tool to
learn about InsForge instructions.
```
Si la conexión se realiza correctamente, verás el indicador de estado **MCP Connected** en tu panel de InsForge (esquina superior derecha).
 ### Instalación
Agrega el servidor MCP de InsForge a tu **Antigravity**:
1. Selecciona **Antigravity** en la lista desplegable
2. Copia y pega el siguiente comando de instalación en tu terminal de **Antigravity**
### Instalación
Agrega el servidor MCP de InsForge a tu **Antigravity**:
1. Selecciona **Antigravity** en la lista desplegable
2. Copia y pega el siguiente comando de instalación en tu terminal de **Antigravity**
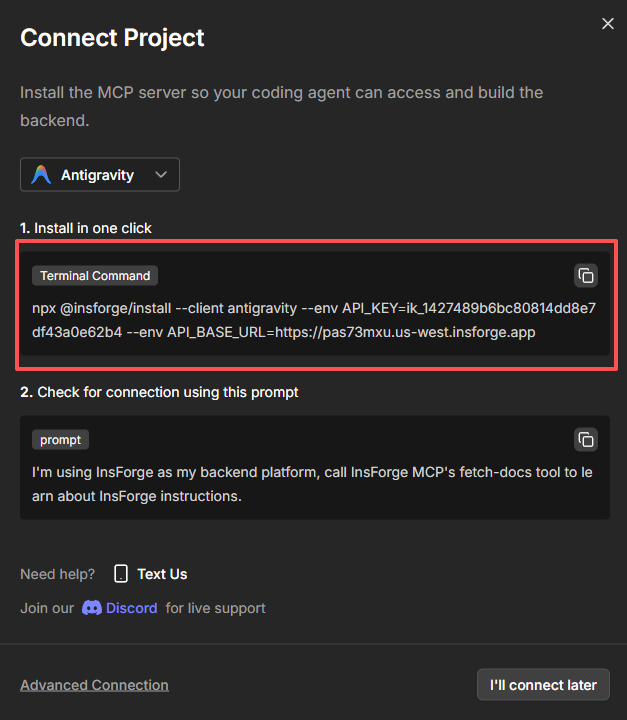 3. Ejecuta el comando
### Verificar la instalación
Para verificar la conexión, inicia una nueva sesión de chat en **Antigravity** y envía este mensaje a tu agente:
```
I'm using InsForge as my backend platform, call InsForge MCP's fetch-docs tool to
learn about InsForge instructions.
```
Si la conexión se realiza correctamente, verás el indicador de estado **MCP Connected** en tu panel de InsForge (esquina superior derecha).
### Instalación
Agrega el servidor MCP de InsForge a tu **Kiro**:
1. Selecciona **Kiro** en la lista desplegable
2. Copia y pega el siguiente comando de instalación en tu terminal de **Kiro**
3. Ejecuta el comando
### Verificar la instalación
Para verificar la conexión, inicia una nueva sesión de chat en **Antigravity** y envía este mensaje a tu agente:
```
I'm using InsForge as my backend platform, call InsForge MCP's fetch-docs tool to
learn about InsForge instructions.
```
Si la conexión se realiza correctamente, verás el indicador de estado **MCP Connected** en tu panel de InsForge (esquina superior derecha).
### Instalación
Agrega el servidor MCP de InsForge a tu **Kiro**:
1. Selecciona **Kiro** en la lista desplegable
2. Copia y pega el siguiente comando de instalación en tu terminal de **Kiro**
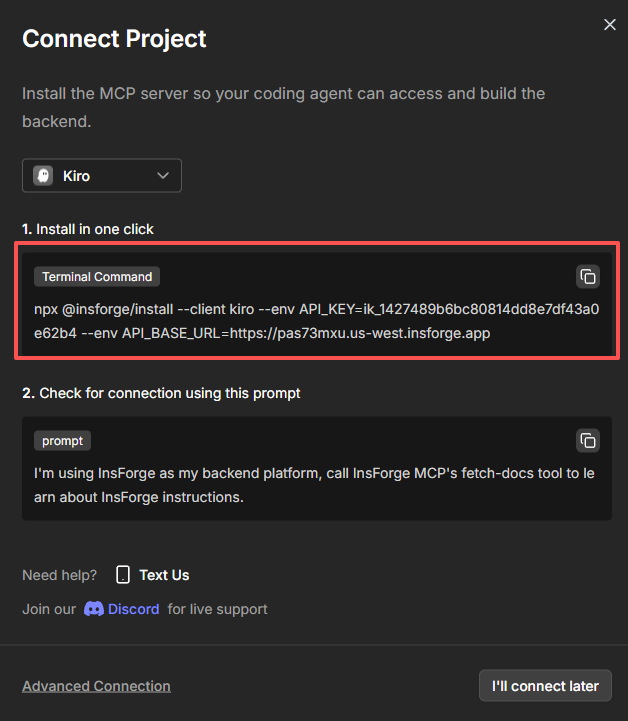 3. Ejecuta el comando
### Verificar la instalación
Para verificar la conexión, inicia una nueva sesión de chat en **Kiro** y envía este mensaje a tu agente:
```
I'm using InsForge as my backend platform, call InsForge MCP's fetch-docs tool to
learn about InsForge instructions.
```
Si la conexión se realiza correctamente, verás el indicador de estado **MCP Connected** en tu panel de InsForge (esquina superior derecha).
### Instalación
Agrega el servidor MCP de InsForge a tu **Codex**:
1. Selecciona **Codex** en la lista desplegable
2. Copia y pega el siguiente comando de instalación en tu terminal
3. Ejecuta el comando
### Verificar la instalación
Para verificar la conexión, inicia una nueva sesión de chat en **Kiro** y envía este mensaje a tu agente:
```
I'm using InsForge as my backend platform, call InsForge MCP's fetch-docs tool to
learn about InsForge instructions.
```
Si la conexión se realiza correctamente, verás el indicador de estado **MCP Connected** en tu panel de InsForge (esquina superior derecha).
### Instalación
Agrega el servidor MCP de InsForge a tu **Codex**:
1. Selecciona **Codex** en la lista desplegable
2. Copia y pega el siguiente comando de instalación en tu terminal
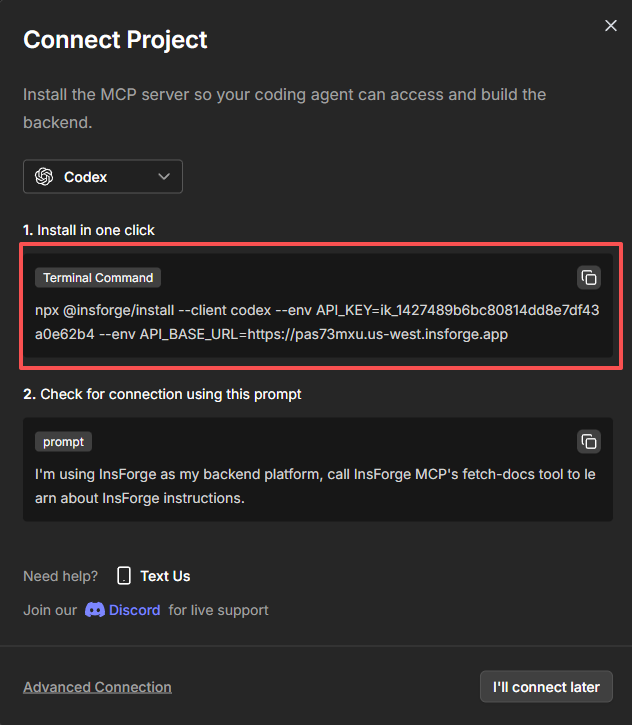 3. Ejecuta el comando
### Verificar la instalación
Para verificar la conexión, inicia una nueva sesión de chat en **Codex** y envía este mensaje a tu agente:
```
I'm using InsForge as my backend platform, call InsForge MCP's fetch-docs tool to
learn about InsForge instructions.
```
Si la conexión se realiza correctamente, verás el indicador de estado **MCP Connected** en tu panel de InsForge (esquina superior derecha).
### Instalación
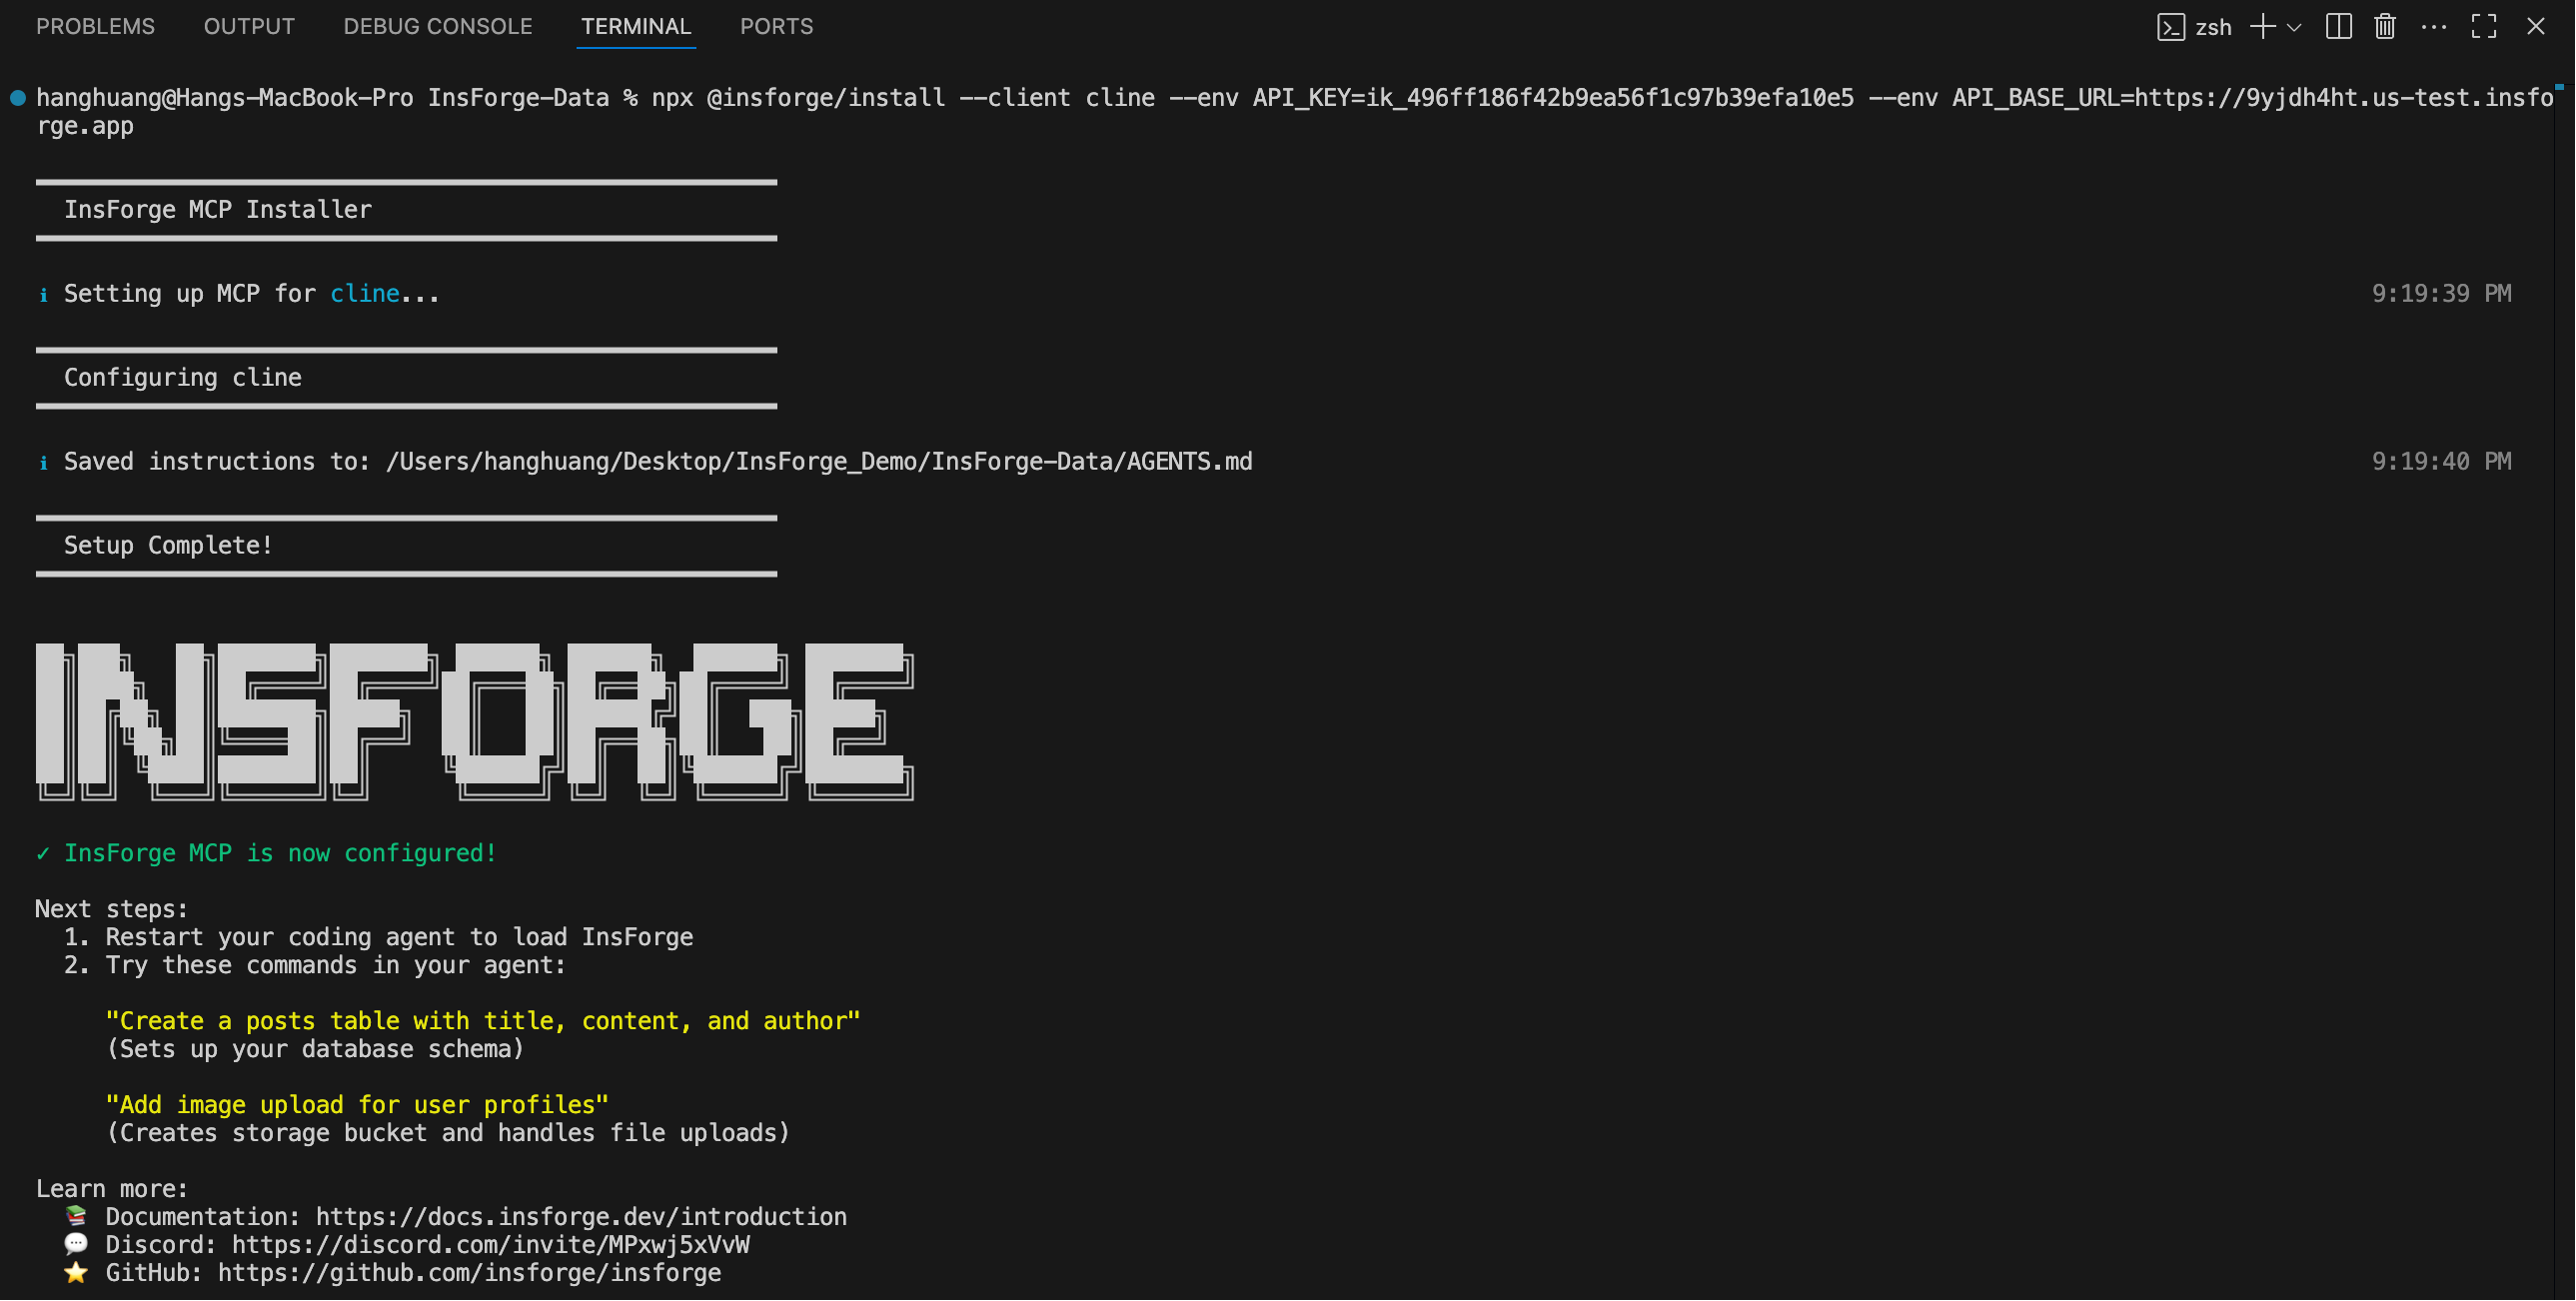
Agrega el servidor MCP de InsForge a tu **Cline**:
1. Selecciona **Cline** en la lista desplegable
2. Copia y pega el siguiente comando de instalación en tu terminal de **Cline**
3. Ejecuta el comando
### Verificar la instalación
Para verificar la conexión, inicia una nueva sesión de chat en **Codex** y envía este mensaje a tu agente:
```
I'm using InsForge as my backend platform, call InsForge MCP's fetch-docs tool to
learn about InsForge instructions.
```
Si la conexión se realiza correctamente, verás el indicador de estado **MCP Connected** en tu panel de InsForge (esquina superior derecha).
### Instalación
Agrega el servidor MCP de InsForge a tu **Cline**:
1. Selecciona **Cline** en la lista desplegable
2. Copia y pega el siguiente comando de instalación en tu terminal de **Cline**
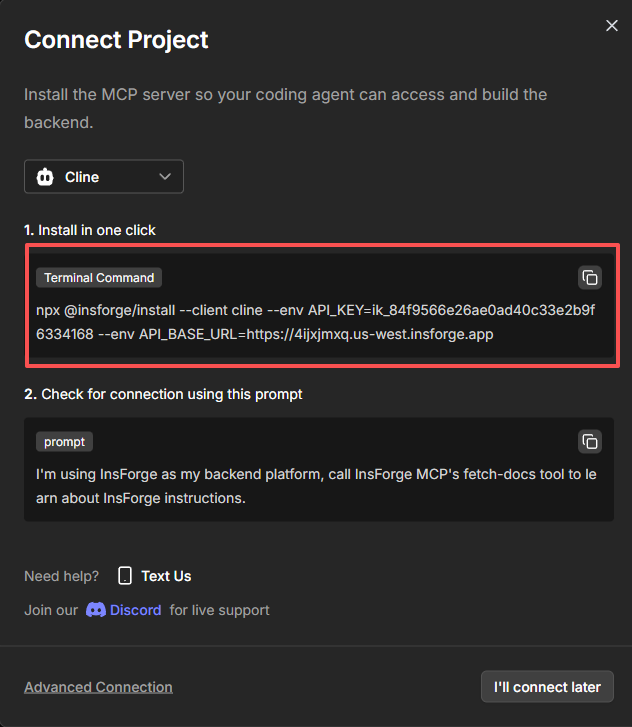 3. Ejecuta el comando
 ### Verificar la instalación
Para verificar la conexión, inicia una nueva sesión de chat en **Cline** y envía este mensaje a tu agente:
```
I'm using InsForge as my backend platform, call InsForge MCP's fetch-docs tool to
learn about InsForge instructions.
```
Si la conexión se realiza correctamente, verás el indicador de estado **MCP Connected** en tu panel de InsForge (esquina superior derecha).
### Instalación
Agrega el servidor MCP de InsForge a tu **Windsurf**:
1. Selecciona **Windsurf** en la lista desplegable
2. Copia y pega el siguiente comando de instalación en tu terminal de Windsurf
### Verificar la instalación
Para verificar la conexión, inicia una nueva sesión de chat en **Cline** y envía este mensaje a tu agente:
```
I'm using InsForge as my backend platform, call InsForge MCP's fetch-docs tool to
learn about InsForge instructions.
```
Si la conexión se realiza correctamente, verás el indicador de estado **MCP Connected** en tu panel de InsForge (esquina superior derecha).
### Instalación
Agrega el servidor MCP de InsForge a tu **Windsurf**:
1. Selecciona **Windsurf** en la lista desplegable
2. Copia y pega el siguiente comando de instalación en tu terminal de Windsurf
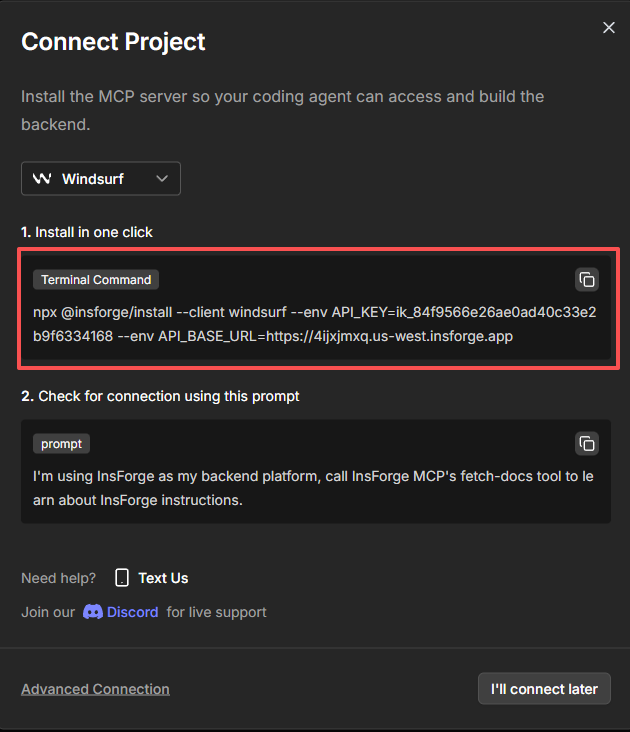 3. Ejecuta el comando
### Verificar la instalación
Para verificar la conexión, inicia una nueva sesión de chat en **Windsurf** y envía este mensaje a tu agente:
```
I'm using InsForge as my backend platform, call InsForge MCP's fetch-docs tool to
learn about InsForge instructions.
```
Si la conexión se realiza correctamente, verás el indicador de estado **MCP Connected** en tu panel de InsForge (esquina superior derecha).
### Instalación
Agrega el servidor MCP de InsForge a tu **Trae**:
1. Selecciona **Trae** en la lista desplegable
2. Copia y pega el siguiente comando de instalación en tu terminal de **Trae**
3. Ejecuta el comando
### Verificar la instalación
Para verificar la conexión, inicia una nueva sesión de chat en **Windsurf** y envía este mensaje a tu agente:
```
I'm using InsForge as my backend platform, call InsForge MCP's fetch-docs tool to
learn about InsForge instructions.
```
Si la conexión se realiza correctamente, verás el indicador de estado **MCP Connected** en tu panel de InsForge (esquina superior derecha).
### Instalación
Agrega el servidor MCP de InsForge a tu **Trae**:
1. Selecciona **Trae** en la lista desplegable
2. Copia y pega el siguiente comando de instalación en tu terminal de **Trae**
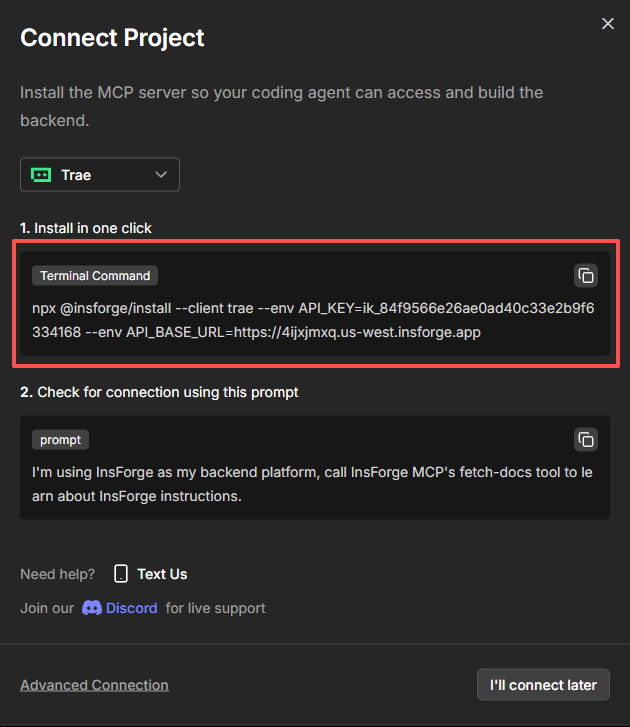 3. Ejecuta el comando
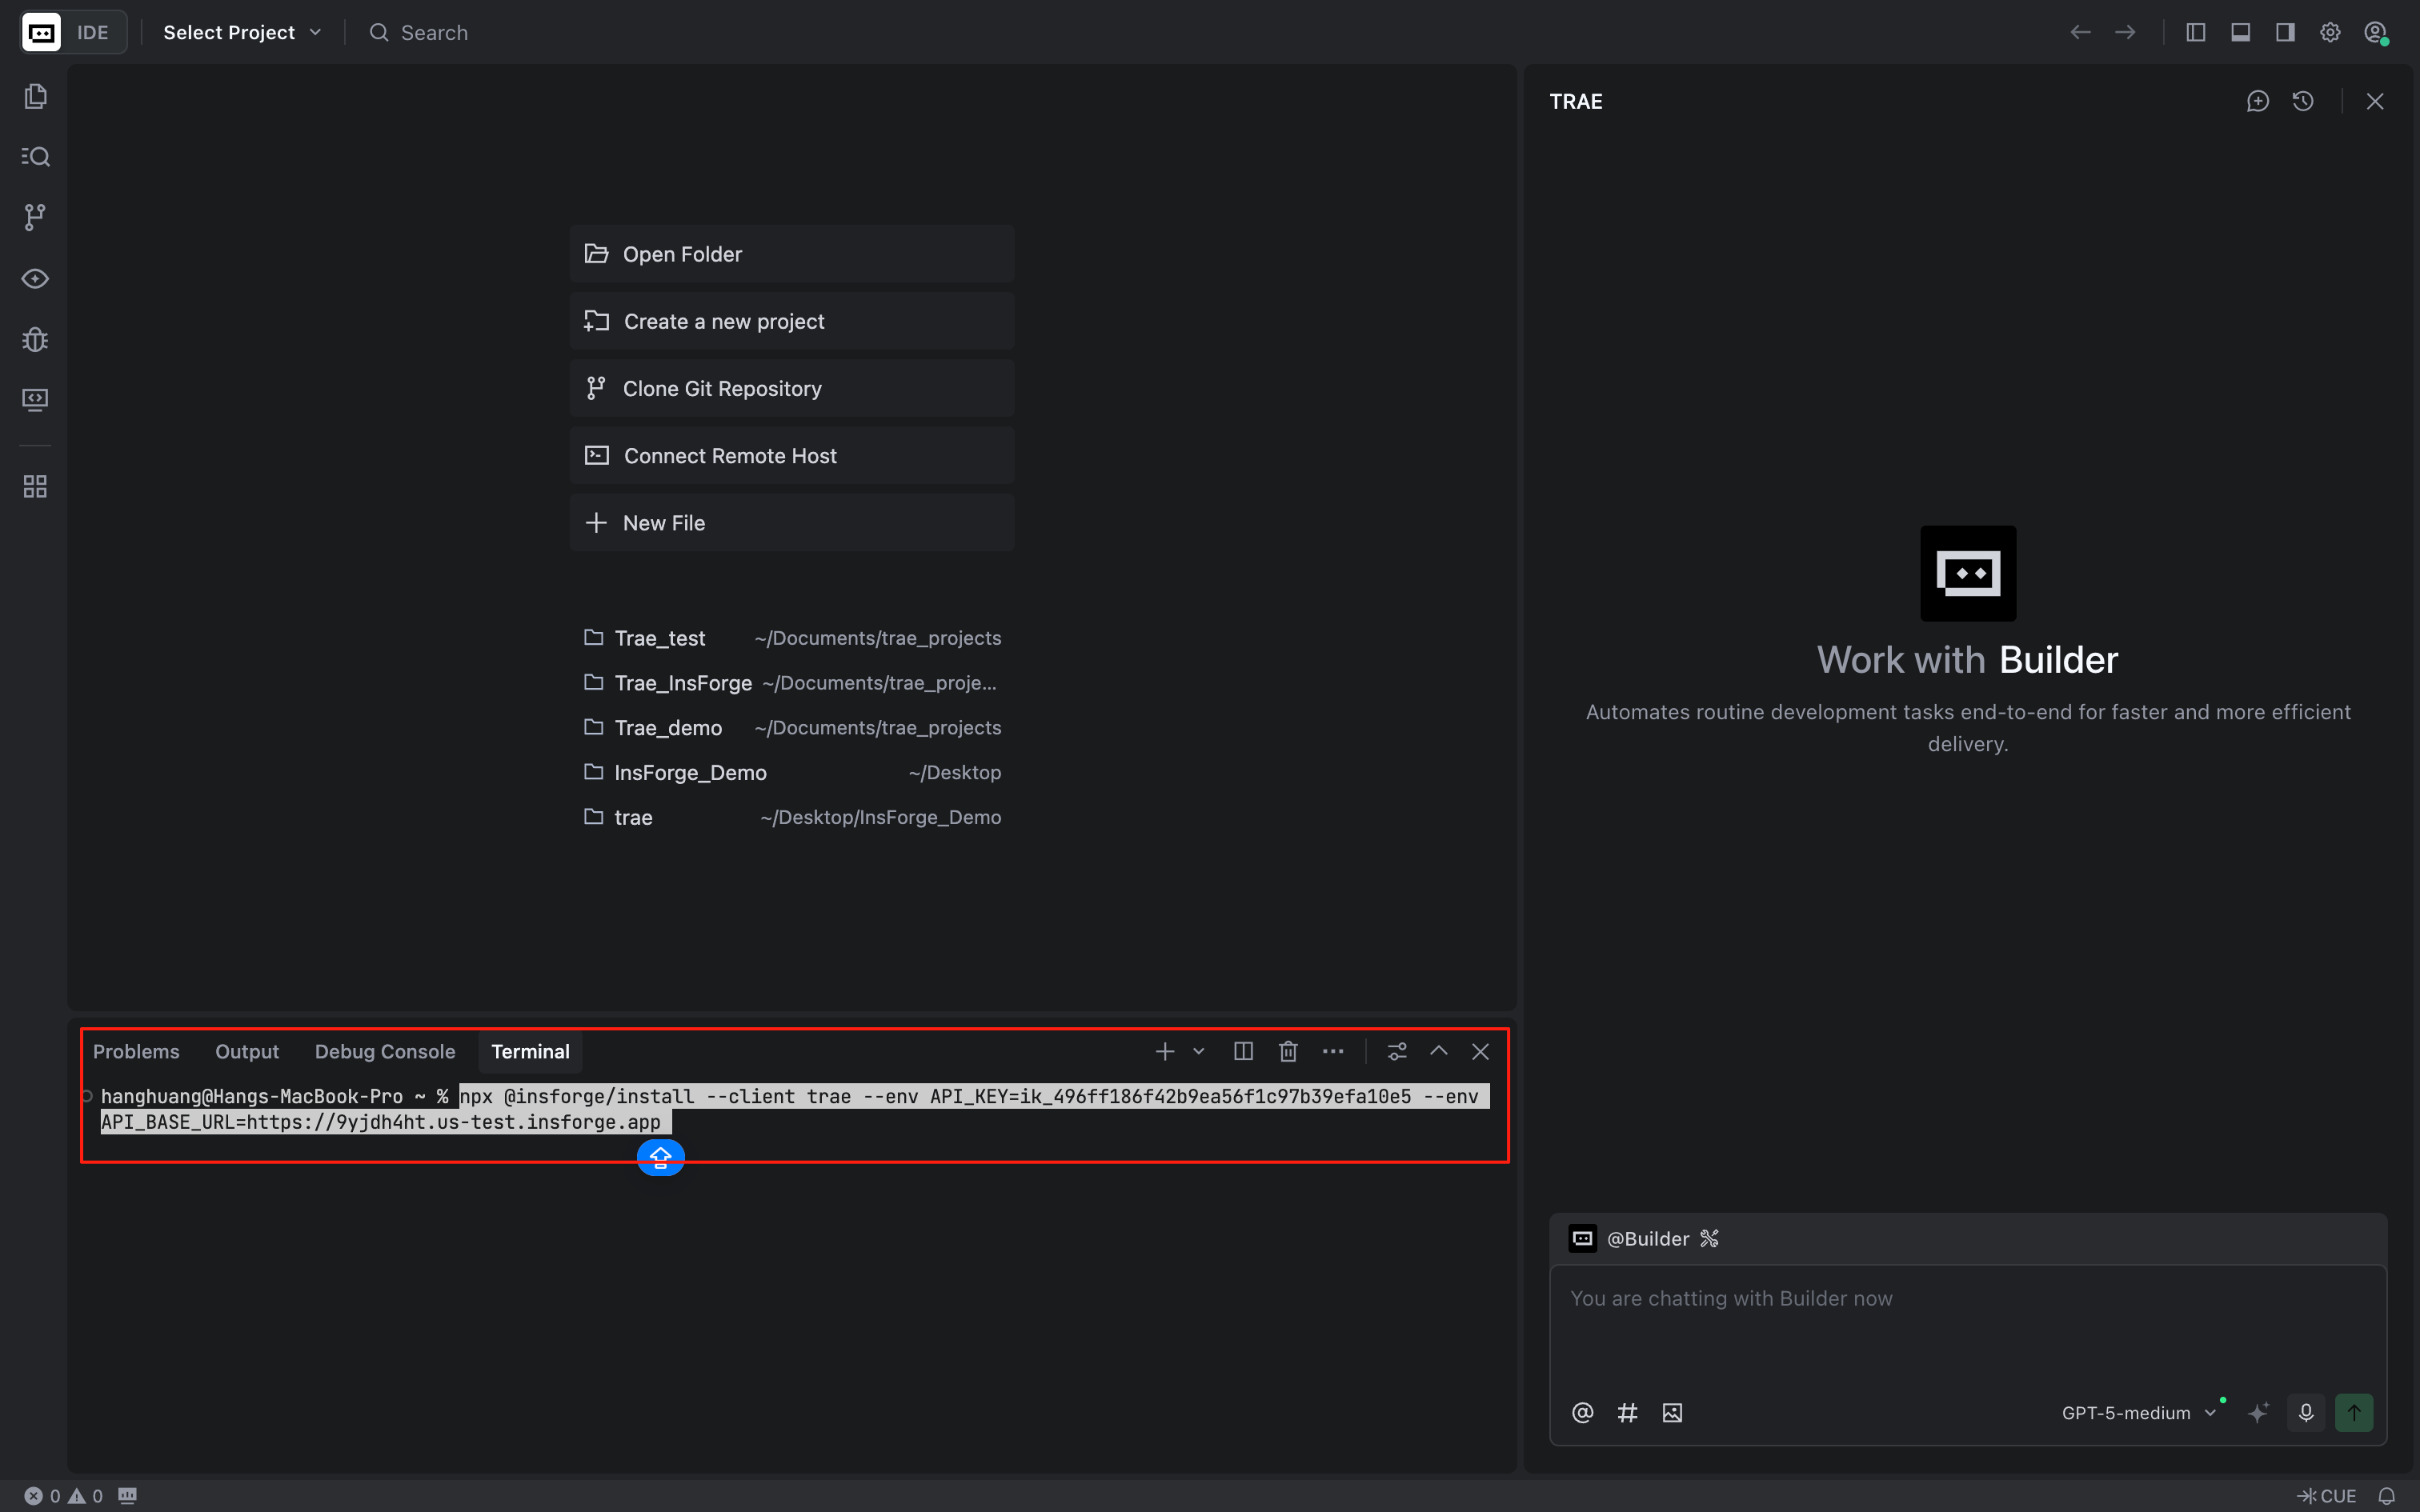 Alternativamente, Trae ofrece una integración propia con InsForge, que te permite instalar InsForge directamente desde el marketplace oficial de MCP de Trae:
1. Abre **Settings** de Trae → navega a **MCP**
2. Haz clic en **Add** y luego selecciona **Add from Marketplace**
3. Busca "InsForge" y agrégalo desde el marketplace
Alternativamente, Trae ofrece una integración propia con InsForge, que te permite instalar InsForge directamente desde el marketplace oficial de MCP de Trae:
1. Abre **Settings** de Trae → navega a **MCP**
2. Haz clic en **Add** y luego selecciona **Add from Marketplace**
3. Busca "InsForge" y agrégalo desde el marketplace
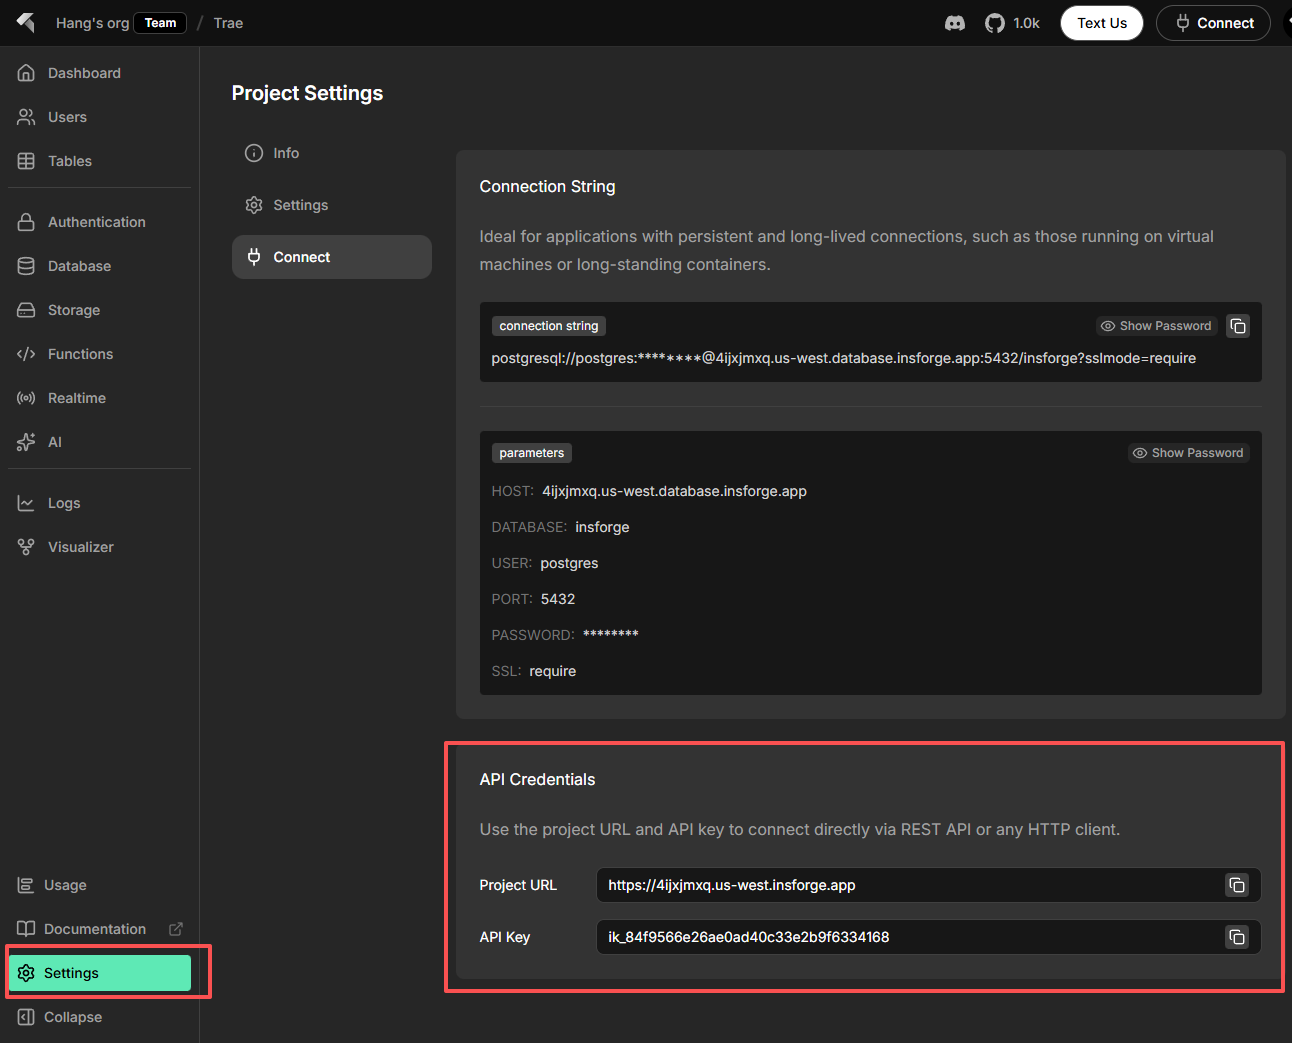
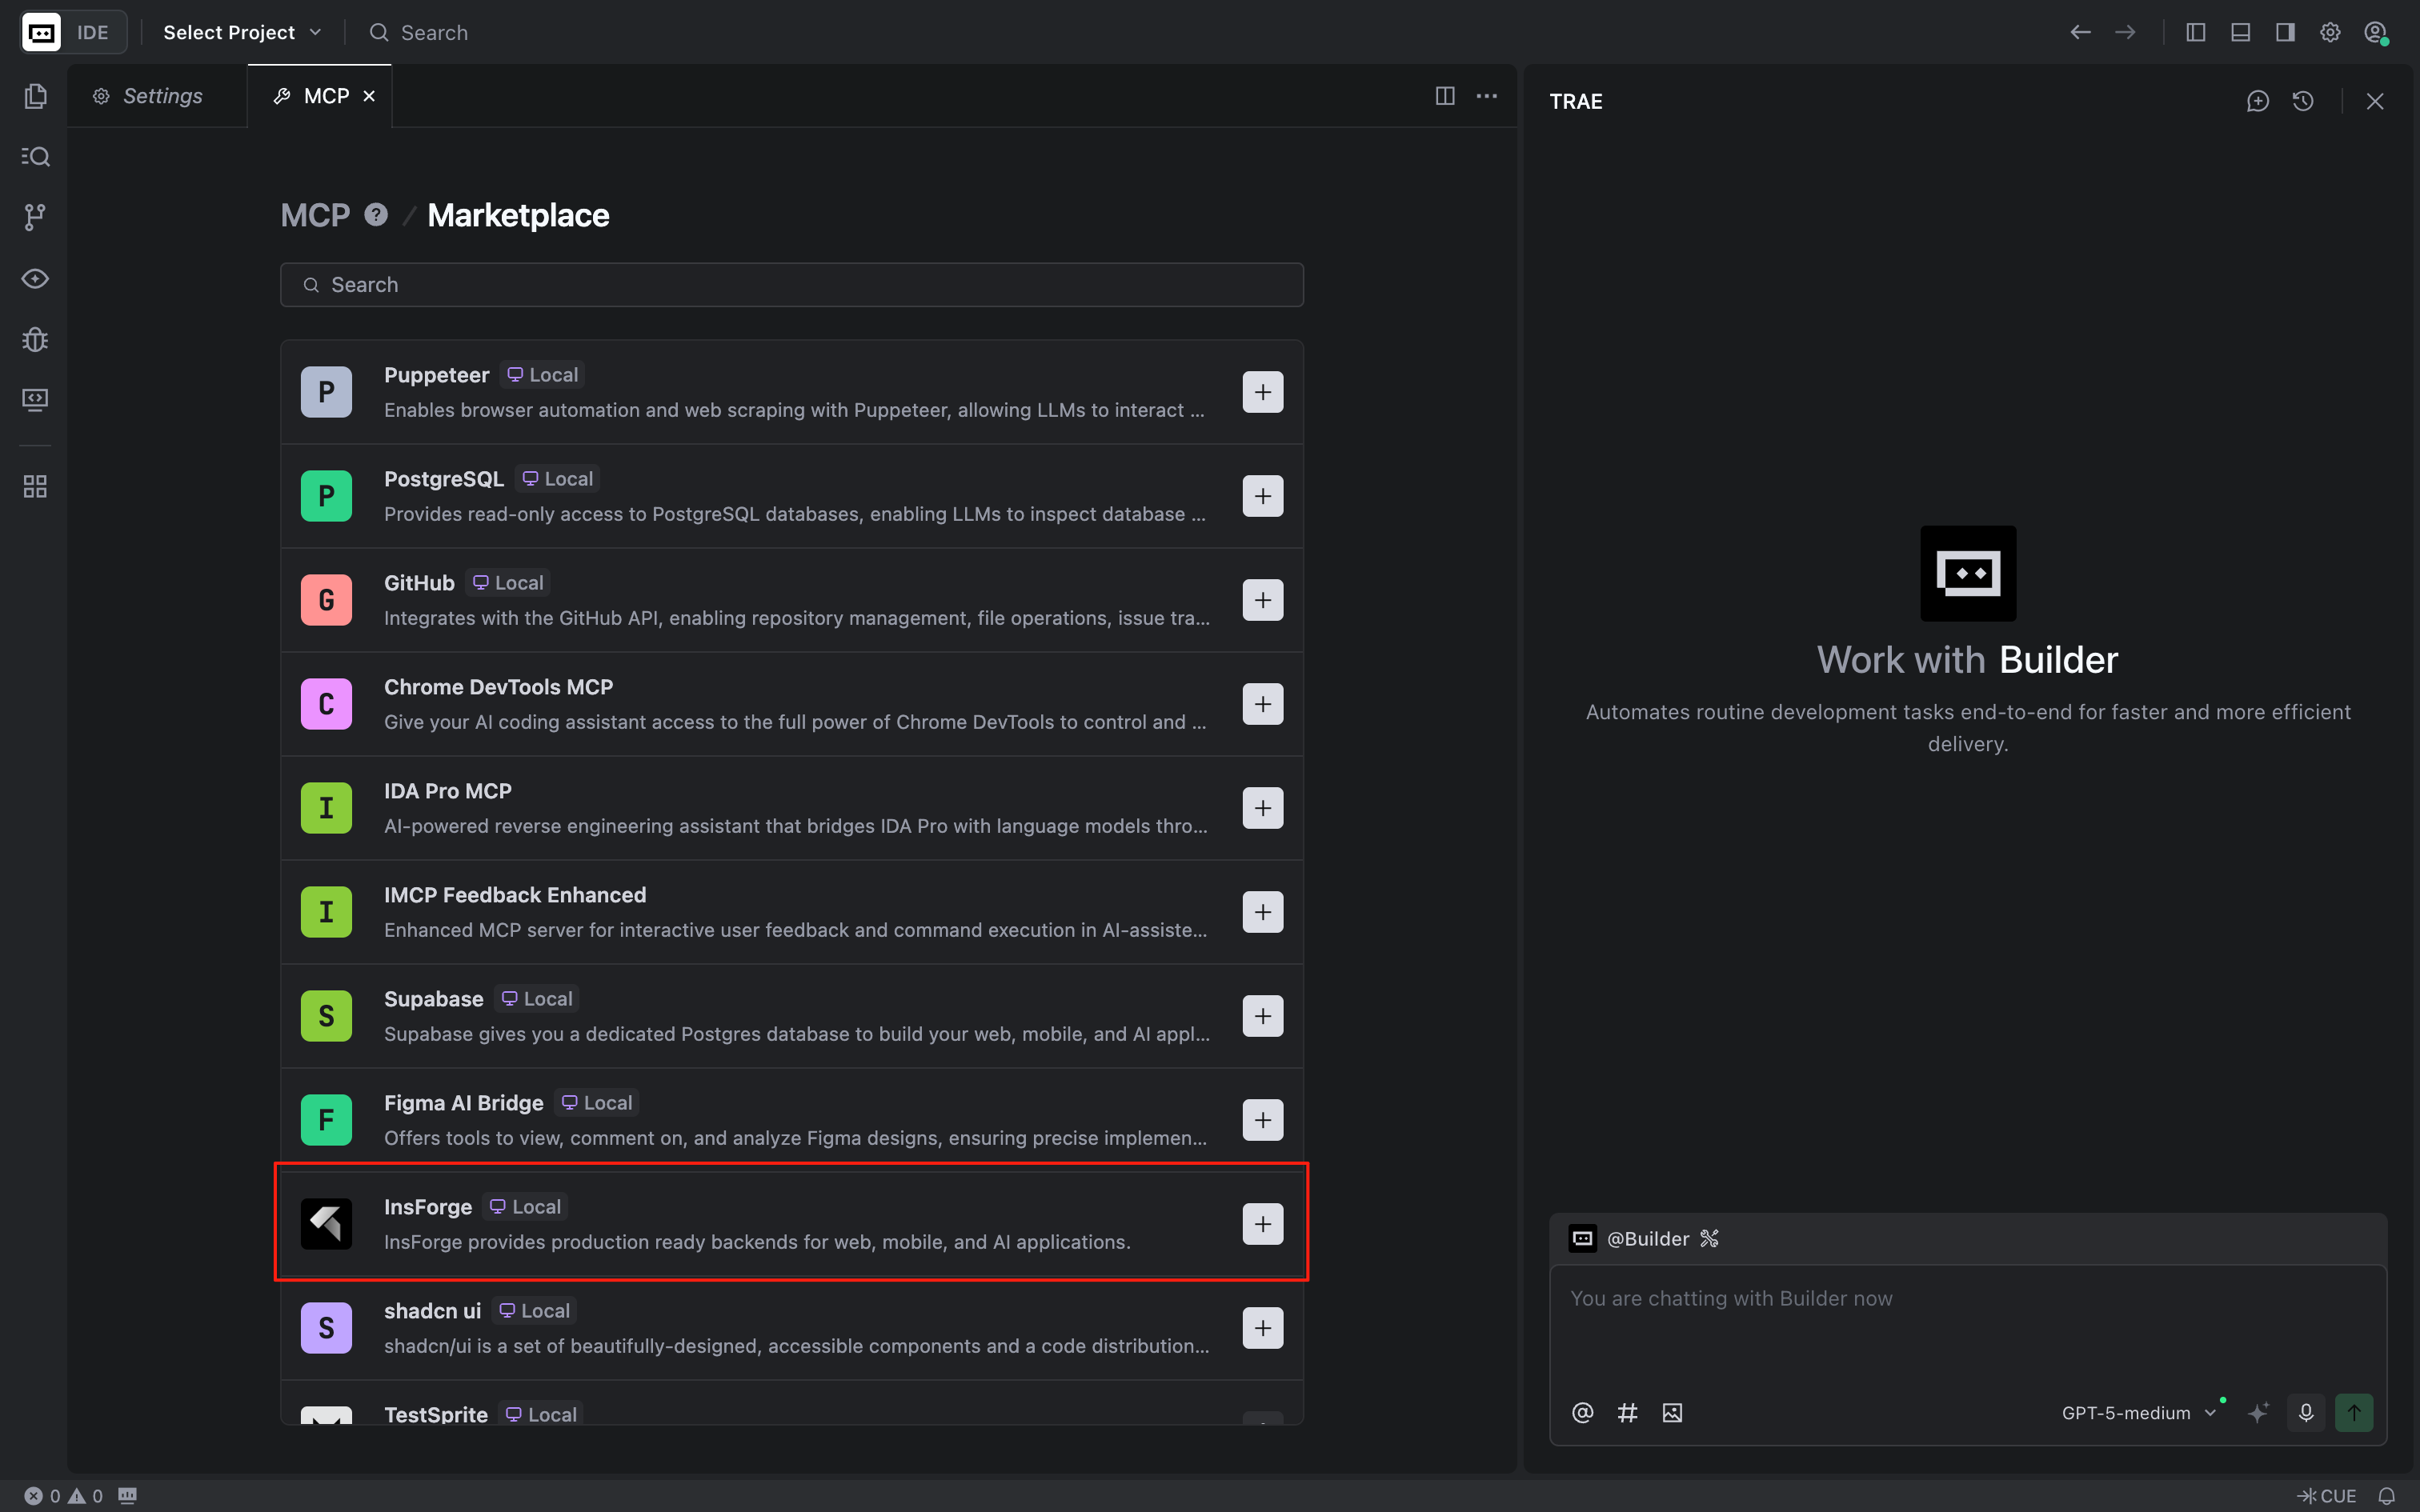 4. Para las credenciales requeridas API\_KEY y API\_BASE\_URL, puedes encontrarlas en tu **Settings** de InsForge, en la pestaña **Connect**
 ### Verificar la instalación
Para verificar la conexión, inicia un nuevo chat en **Trae** y envía este mensaje a tu agente:
```
I'm using InsForge as my backend platform, call InsForge MCP's fetch-docs tool to
learn about InsForge instructions.
```
Si la conexión se realiza correctamente, verás el indicador de estado **MCP Connected** en tu panel de InsForge (esquina superior derecha).
### Instalación
Agrega el servidor MCP de InsForge a tu **Qoder**:
1. Selecciona **Qoder** en la lista desplegable
2. Copia y pega el siguiente comando de instalación en tu terminal de **Qoder**
### Verificar la instalación
Para verificar la conexión, inicia un nuevo chat en **Trae** y envía este mensaje a tu agente:
```
I'm using InsForge as my backend platform, call InsForge MCP's fetch-docs tool to
learn about InsForge instructions.
```
Si la conexión se realiza correctamente, verás el indicador de estado **MCP Connected** en tu panel de InsForge (esquina superior derecha).
### Instalación
Agrega el servidor MCP de InsForge a tu **Qoder**:
1. Selecciona **Qoder** en la lista desplegable
2. Copia y pega el siguiente comando de instalación en tu terminal de **Qoder**
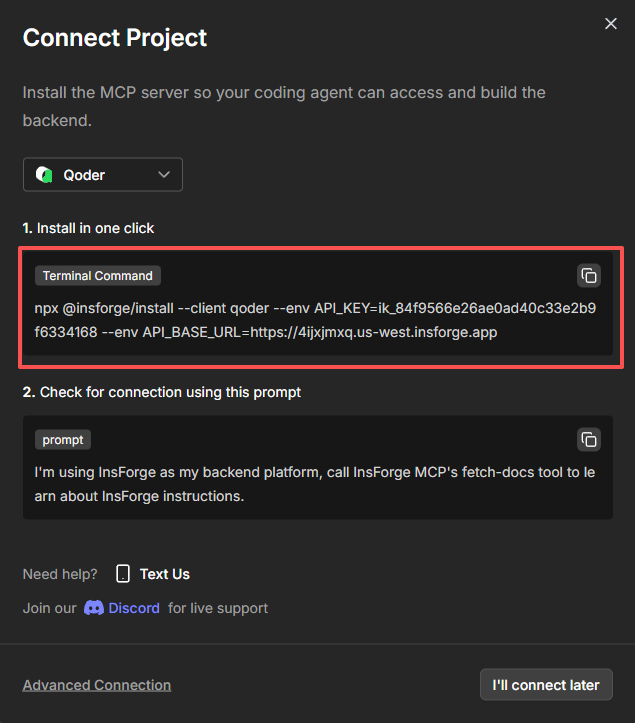 3. Ejecuta el comando
### Verificar la instalación
Para verificar la conexión, inicia una nueva sesión de chat en **Qoder** y envía este mensaje a tu agente:
```
I'm using InsForge as my backend platform, call InsForge MCP's fetch-docs tool to
learn about InsForge instructions.
```
Si la conexión se realiza correctamente, verás el indicador de estado **MCP Connected** en tu panel de InsForge (esquina superior derecha).
### Instalación
Agrega el servidor MCP de InsForge a tu **Roo Code**:
1. Selecciona **Roo Code** en la lista desplegable
2. Copia y pega el siguiente comando de instalación en tu terminal de **Roo Code**
3. Ejecuta el comando
### Verificar la instalación
Para verificar la conexión, inicia una nueva sesión de chat en **Qoder** y envía este mensaje a tu agente:
```
I'm using InsForge as my backend platform, call InsForge MCP's fetch-docs tool to
learn about InsForge instructions.
```
Si la conexión se realiza correctamente, verás el indicador de estado **MCP Connected** en tu panel de InsForge (esquina superior derecha).
### Instalación
Agrega el servidor MCP de InsForge a tu **Roo Code**:
1. Selecciona **Roo Code** en la lista desplegable
2. Copia y pega el siguiente comando de instalación en tu terminal de **Roo Code**
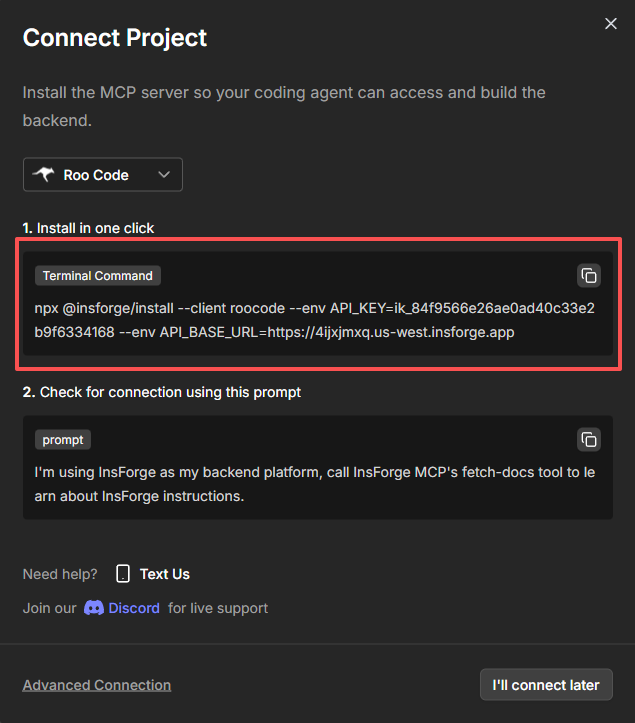 3. Ejecuta el comando
### Verificar la instalación
Para verificar la conexión, inicia una nueva sesión de chat en **Roo Code** y envía este mensaje a tu agente:
```
I'm using InsForge as my backend platform, call InsForge MCP's fetch-docs tool to
learn about InsForge instructions.
```
Si la conexión se realiza correctamente, verás el indicador de estado **MCP Connected** en tu panel de InsForge (esquina superior derecha).
### Instalación
Agrega el servidor MCP de InsForge a tu **OpenCode**:
1. Selecciona **OpenCode** en la lista desplegable
2. Copia y pega el siguiente comando de instalación en tu terminal
3. Ejecuta el comando
### Verificar la instalación
Para verificar la conexión, inicia una nueva sesión de chat en **OpenCode** y envía este mensaje a tu agente:
```
I'm using InsForge as my backend platform, call InsForge MCP's fetch-docs tool to
learn about InsForge instructions.
```
Si la conexión se realiza correctamente, verás el indicador de estado **MCP Connected** en tu panel de InsForge (esquina superior derecha).
### Instalación
Agrega el servidor MCP de InsForge a tu agente de codificación con MCP JSON:
1. Selecciona **MCP JSON** en la lista desplegable
2. Copia y pega la siguiente configuración de **MCP JSON** en tu agente
3. Ejecuta el comando
### Verificar la instalación
Para verificar la conexión, inicia una nueva sesión de chat en **Roo Code** y envía este mensaje a tu agente:
```
I'm using InsForge as my backend platform, call InsForge MCP's fetch-docs tool to
learn about InsForge instructions.
```
Si la conexión se realiza correctamente, verás el indicador de estado **MCP Connected** en tu panel de InsForge (esquina superior derecha).
### Instalación
Agrega el servidor MCP de InsForge a tu **OpenCode**:
1. Selecciona **OpenCode** en la lista desplegable
2. Copia y pega el siguiente comando de instalación en tu terminal
3. Ejecuta el comando
### Verificar la instalación
Para verificar la conexión, inicia una nueva sesión de chat en **OpenCode** y envía este mensaje a tu agente:
```
I'm using InsForge as my backend platform, call InsForge MCP's fetch-docs tool to
learn about InsForge instructions.
```
Si la conexión se realiza correctamente, verás el indicador de estado **MCP Connected** en tu panel de InsForge (esquina superior derecha).
### Instalación
Agrega el servidor MCP de InsForge a tu agente de codificación con MCP JSON:
1. Selecciona **MCP JSON** en la lista desplegable
2. Copia y pega la siguiente configuración de **MCP JSON** en tu agente
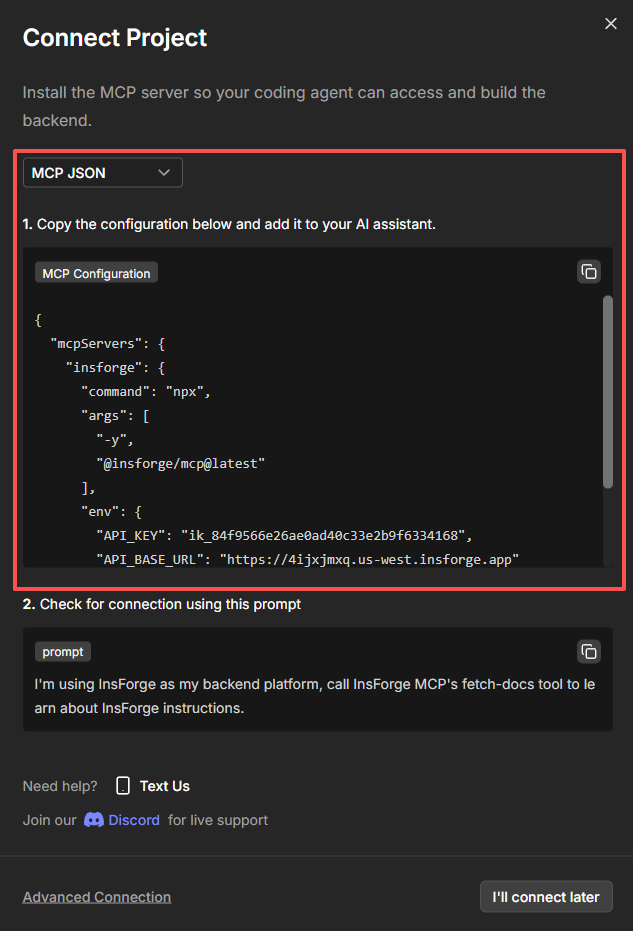 ### Verificar la instalación
Para verificar la conexión, inicia una nueva sesión de chat y envía este mensaje a tu agente:
```
I'm using InsForge as my backend platform, call InsForge MCP's fetch-docs tool to
learn about InsForge instructions.
```
Si la conexión se realiza correctamente, verás el indicador de estado **MCP Connected** en tu panel de InsForge (esquina superior derecha).
## MCP remoto
La forma más rápida de empezar es con MCP remoto. Un solo comando intenta la instalación e intentará gestionar la autenticación y la vinculación del proyecto, pero puede que aun así te pida pasos manuales de autenticación o vinculación de proyecto si el flujo automático no puede completarse.
Ejecuta el siguiente comando en tu terminal:
```bash theme={null}
npx add-mcp https://mcp.insforge.dev/mcp
```
El comando `add-mcp` funciona para la mayoría de los agentes de codificación, pero no para todos. Actualmente admite:
Claude Code, Claude Desktop, Codex, Cursor, Gemini CLI, Goose, GitHub Copilot, OpenCode, VS Code, Zed.
Después de ejecutar el comando, el sistema generará automáticamente un archivo de configuración para tu agente de codificación.
### Conectar y vincular el proyecto
Algunos clientes MCP te pedirán iniciar sesión automáticamente durante la configuración, mientras que otros pueden requerir pasos manuales de autenticación o vinculación de proyecto si el flujo automático no puede completarse. De cualquier forma, la autenticación abrirá una ventana del navegador donde podrás iniciar sesión en tu cuenta de InsForge y conceder acceso de organización/proyecto al cliente MCP.
Encontrarás el archivo de configuración en `.cursor/mcp.json` como se muestra a continuación:
```json theme={null}
{
"mcpServers": {
"insforge": {
"url": "https://mcp.insforge.dev/mcp"
}
}
}
```
En el menú **Preferences → Cursor Settings → Tools & MCP**, deberías ver que el servidor MCP de InsForge se agregó correctamente.
El servidor MCP de InsForge está en el estado "Needs authentication"; puedes hacer clic en el botón `connect` para autenticarte.
Después de la instalación, encontrarás el archivo de configuración en `.mcp.json` como se muestra a continuación:
```json theme={null}
{
"mcpServers": {
"insforge": {
"type": "http",
"url": "https://mcp.insforge.dev/mcp"
}
}
}
```
Luego, en una terminal normal (no en la extensión del IDE), ejecuta:
```sh theme={null}
claude /mcp
```
Selecciona el servidor "insforge" y luego "Authenticate" para iniciar el flujo de autenticación.
Después de la instalación, encontrarás el archivo de configuración en `.vscode/mcp.json` como se muestra a continuación:
```json theme={null}
{
"servers": {
"insforge": {
"type": "http",
"url": "https://mcp.insforge.dev/mcp"
}
}
}
```
Agrega esta configuración a `~/.gemini/antigravity/mcp_config.json`:
```json theme={null}
{
"mcpServers": {
"insforge": {
"serverUrl": "https://mcp.insforge.dev/mcp"
}
}
}
```
Luego reinicia Antigravity; se autenticará automáticamente.
Después de la instalación, encontrarás el archivo de configuración en `.gemini/settings.json` como se muestra a continuación:
```json theme={null}
{
"mcpServers": {
"insforge": {
"type": "http",
"url": "https://mcp.insforge.dev/mcp"
}
}
}
```
Inicia la Gemini CLI y ejecuta el siguiente comando para autenticar el servidor:
```sh theme={null}
/mcp auth insforge
```
Si es la primera vez que usas Codex, es posible que debas habilitar la función rmcp. Para ello, agrega lo siguiente a tu archivo `~/.codex/config.toml`:
```toml theme={null}
[beta]
rmcp = true
```
Después de la instalación, encontrarás el archivo de configuración en `.codex/config.toml` como se muestra a continuación:
```toml theme={null}
[mcp_servers.insforge]
type = "http"
url = "https://mcp.insforge.dev/mcp"
```
Luego autentícate:
```sh theme={null}
codex mcp login insforge
```
Finalmente, ejecuta /mcp dentro de Codex para verificar la autenticación.
Alternativamente, puedes ejecutar el siguiente comando para instalar el servidor MCP:
```sh theme={null}
codex mcp add insforge --url https://mcp.insforge.dev/mcp
```
Puedes instalar el servidor MCP de InsForge en tu **Cline** ejecutando el siguiente comando en tu terminal:
```bash theme={null}
npx -y @smithery/cli mcp add devel/insforge --client cline
```
Alternativamente, puedes seguir la [documentación oficial de Cline](https://docs.cline.bot/mcp/connecting-to-a-remote-server) para agregar el servidor MCP de InsForge con los siguientes parámetros:
* Server Name: `insforge`
* Server URL: `https://mcp.insforge.dev/mcp`
* Transport Type: `Streamable HTTP`
Después de agregar el servidor, verás un mensaje de error que solicita autenticarte. Haz clic en el botón "Authenticate" que aparece para autenticarte.
Agrega esta configuración a `~/.codeium/windsurf/mcp_config.json`:
```json theme={null}
{
"mcpServers": {
"insforge": {
"command": "npx",
"args": [
"-y",
"mcp-remote",
"https://mcp.insforge.dev/mcp"
]
}
}
}
```
Windsurf actualmente no admite servidores MCP remotos mediante transporte HTTP. Debes usar el paquete mcp-remote como proxy.
Puedes instalar el servidor MCP de InsForge en tu **Roo Code** ejecutando el siguiente comando en tu terminal:
```bash theme={null}
npx -y @smithery/cli mcp add devel/insforge --client roocode
```
Después de la instalación, encontrarás el archivo de configuración en `./opencode.json` como se muestra a continuación:
```json theme={null}
{
"mcp": {
"insforge": {
"type": "remote",
"url": "https://mcp.insforge.dev/mcp",
"enabled": true
}
}
}
```
Luego ejecuta el siguiente comando para autenticarte:
```sh theme={null}
opencode mcp auth insforge
```
Esto abrirá tu navegador para completar el flujo de autenticación OAuth.
### Verificar la instalación
Para verificar la conexión, inicia una nueva sesión de chat en tu asistente de codificación con IA y envía este mensaje:
```
I'm using InsForge as my backend platform, call InsForge MCP's fetch-docs tool to
learn about InsForge instructions.
```
Si la conexión se realiza correctamente, verás el indicador de estado **MCP Connected** en tu panel de InsForge (esquina superior derecha).
## Solución de problemas
La mayoría de los clientes de IA requieren un reinicio completo después de cambios en la configuración de MCP. Cierra y vuelve a abrir la aplicación.
### Verificar la instalación
Para verificar la conexión, inicia una nueva sesión de chat y envía este mensaje a tu agente:
```
I'm using InsForge as my backend platform, call InsForge MCP's fetch-docs tool to
learn about InsForge instructions.
```
Si la conexión se realiza correctamente, verás el indicador de estado **MCP Connected** en tu panel de InsForge (esquina superior derecha).
## MCP remoto
La forma más rápida de empezar es con MCP remoto. Un solo comando intenta la instalación e intentará gestionar la autenticación y la vinculación del proyecto, pero puede que aun así te pida pasos manuales de autenticación o vinculación de proyecto si el flujo automático no puede completarse.
Ejecuta el siguiente comando en tu terminal:
```bash theme={null}
npx add-mcp https://mcp.insforge.dev/mcp
```
El comando `add-mcp` funciona para la mayoría de los agentes de codificación, pero no para todos. Actualmente admite:
Claude Code, Claude Desktop, Codex, Cursor, Gemini CLI, Goose, GitHub Copilot, OpenCode, VS Code, Zed.
Después de ejecutar el comando, el sistema generará automáticamente un archivo de configuración para tu agente de codificación.
### Conectar y vincular el proyecto
Algunos clientes MCP te pedirán iniciar sesión automáticamente durante la configuración, mientras que otros pueden requerir pasos manuales de autenticación o vinculación de proyecto si el flujo automático no puede completarse. De cualquier forma, la autenticación abrirá una ventana del navegador donde podrás iniciar sesión en tu cuenta de InsForge y conceder acceso de organización/proyecto al cliente MCP.
Encontrarás el archivo de configuración en `.cursor/mcp.json` como se muestra a continuación:
```json theme={null}
{
"mcpServers": {
"insforge": {
"url": "https://mcp.insforge.dev/mcp"
}
}
}
```
En el menú **Preferences → Cursor Settings → Tools & MCP**, deberías ver que el servidor MCP de InsForge se agregó correctamente.
El servidor MCP de InsForge está en el estado "Needs authentication"; puedes hacer clic en el botón `connect` para autenticarte.
Después de la instalación, encontrarás el archivo de configuración en `.mcp.json` como se muestra a continuación:
```json theme={null}
{
"mcpServers": {
"insforge": {
"type": "http",
"url": "https://mcp.insforge.dev/mcp"
}
}
}
```
Luego, en una terminal normal (no en la extensión del IDE), ejecuta:
```sh theme={null}
claude /mcp
```
Selecciona el servidor "insforge" y luego "Authenticate" para iniciar el flujo de autenticación.
Después de la instalación, encontrarás el archivo de configuración en `.vscode/mcp.json` como se muestra a continuación:
```json theme={null}
{
"servers": {
"insforge": {
"type": "http",
"url": "https://mcp.insforge.dev/mcp"
}
}
}
```
Agrega esta configuración a `~/.gemini/antigravity/mcp_config.json`:
```json theme={null}
{
"mcpServers": {
"insforge": {
"serverUrl": "https://mcp.insforge.dev/mcp"
}
}
}
```
Luego reinicia Antigravity; se autenticará automáticamente.
Después de la instalación, encontrarás el archivo de configuración en `.gemini/settings.json` como se muestra a continuación:
```json theme={null}
{
"mcpServers": {
"insforge": {
"type": "http",
"url": "https://mcp.insforge.dev/mcp"
}
}
}
```
Inicia la Gemini CLI y ejecuta el siguiente comando para autenticar el servidor:
```sh theme={null}
/mcp auth insforge
```
Si es la primera vez que usas Codex, es posible que debas habilitar la función rmcp. Para ello, agrega lo siguiente a tu archivo `~/.codex/config.toml`:
```toml theme={null}
[beta]
rmcp = true
```
Después de la instalación, encontrarás el archivo de configuración en `.codex/config.toml` como se muestra a continuación:
```toml theme={null}
[mcp_servers.insforge]
type = "http"
url = "https://mcp.insforge.dev/mcp"
```
Luego autentícate:
```sh theme={null}
codex mcp login insforge
```
Finalmente, ejecuta /mcp dentro de Codex para verificar la autenticación.
Alternativamente, puedes ejecutar el siguiente comando para instalar el servidor MCP:
```sh theme={null}
codex mcp add insforge --url https://mcp.insforge.dev/mcp
```
Puedes instalar el servidor MCP de InsForge en tu **Cline** ejecutando el siguiente comando en tu terminal:
```bash theme={null}
npx -y @smithery/cli mcp add devel/insforge --client cline
```
Alternativamente, puedes seguir la [documentación oficial de Cline](https://docs.cline.bot/mcp/connecting-to-a-remote-server) para agregar el servidor MCP de InsForge con los siguientes parámetros:
* Server Name: `insforge`
* Server URL: `https://mcp.insforge.dev/mcp`
* Transport Type: `Streamable HTTP`
Después de agregar el servidor, verás un mensaje de error que solicita autenticarte. Haz clic en el botón "Authenticate" que aparece para autenticarte.
Agrega esta configuración a `~/.codeium/windsurf/mcp_config.json`:
```json theme={null}
{
"mcpServers": {
"insforge": {
"command": "npx",
"args": [
"-y",
"mcp-remote",
"https://mcp.insforge.dev/mcp"
]
}
}
}
```
Windsurf actualmente no admite servidores MCP remotos mediante transporte HTTP. Debes usar el paquete mcp-remote como proxy.
Puedes instalar el servidor MCP de InsForge en tu **Roo Code** ejecutando el siguiente comando en tu terminal:
```bash theme={null}
npx -y @smithery/cli mcp add devel/insforge --client roocode
```
Después de la instalación, encontrarás el archivo de configuración en `./opencode.json` como se muestra a continuación:
```json theme={null}
{
"mcp": {
"insforge": {
"type": "remote",
"url": "https://mcp.insforge.dev/mcp",
"enabled": true
}
}
}
```
Luego ejecuta el siguiente comando para autenticarte:
```sh theme={null}
opencode mcp auth insforge
```
Esto abrirá tu navegador para completar el flujo de autenticación OAuth.
### Verificar la instalación
Para verificar la conexión, inicia una nueva sesión de chat en tu asistente de codificación con IA y envía este mensaje:
```
I'm using InsForge as my backend platform, call InsForge MCP's fetch-docs tool to
learn about InsForge instructions.
```
Si la conexión se realiza correctamente, verás el indicador de estado **MCP Connected** en tu panel de InsForge (esquina superior derecha).
## Solución de problemas
La mayoría de los clientes de IA requieren un reinicio completo después de cambios en la configuración de MCP. Cierra y vuelve a abrir la aplicación.